
*This Blogpost is in Dutch AND English!*
Welkom bij de APRIL Bloghop van het internationale Thinking Outside of the Box-Design Team!
Je bent hier zojuist begonnen, of je bent hier gekomen via mijn creatieve engelse collega Zoe Tant
Hello and welcome to the APRIL Bloghop of the Thinking Outside of the Box Design Team! You just started this bloghop here, or you got here through my creative colleague from the UK Zoe Tant

Het thema van deze maand is het maken van een (milkbox-)carrierbox, een doosje waarin weer andere doosjes of objecten passen, met ingebouwde handgreep.
Theme of this month is making a (milkbox-)carrierbox, a box in which you can fit other boxes or objects, with a built-in handle

Ik besloot er mijn eigen variant op te maken en maakte een Carrier/Caddy met wat essentiele benodigdheden om kaartjes te maken. Handig voor op je knutseltafel, maar ook erg leuk om kado te geven aan een andere stempelfan!
I decided to make my own version and made a Carrier/Caddy with the most essential products to make cards. It is a nice and handy box for on your crafttable but also a nice gift for other Stamp-Fans!


Maar natuurlijk is dit doosje ook heel geschikt om een voorraad zelfgemaakte kaartjes in te doen en kado te geven!
But ofcourse this box is also a perfect fit for filling it with a stack of handmade cards, to give to those as a present!

Als je het leuk vindt kun je dit geinige doosje ook maken, door gewoon de stap-voor-stap tutorial te volgen. Het is echt niet moeilijk, maar wel is het belangrijk om tamelijk precies te werken. Laten we gaan beginnen!
If you would like to, you can make this fun box too! Just follow the step by step tutorial. It is not difficult at all, but it is important to measure and cut with precision and care. Come on, let's start!
Basis van het doosje
Basic Part of the box
Voor dit doosje heb je twee stukken Bermuda Bay Cardstock nodig van 21 bij 22,5 centimeter.
For the basic part of the box you need two pieces of Bermuday Bay Cardstock of 21 x 22,5 cm
Leg het cardstock in de hoogte/lengte voor je, en ril aan beide zijden, op 3,5 cm van de zijkant een lijn
Lay the carstock in front of you lengthwise, and score both pieces at 3,5 cm from both sides.

Draai het cardstock 90 graden en ril nu lijnen op 13 en 16 cm van de linkerkant
Turn the cardstock 90 degrees and score the cardstock at 13 and 16 cm from the left side.

Meet en teken lijntjes zoals afgebeeld in rood op 3,5 cm vanaf de zijkant van het cardstock
Measure and draw lines as shown in red below at 3,5 cm from the left side of the cardstock

Knip de zo ontstane vierkantjes weg en daarna knip je kleine "hapjes"uit het cardstock, zoals op onderstaande foto te zien is.....
Cut the squares that have appeared at the left side, as shown, and after that cut out little pointy bits as shown in the picture below...

Draai nu het cardstock weer 90 graden terug, naar de oorspronkelijke richting.
Now turn back the cardstock 90 degrees, as it was in the beginning.
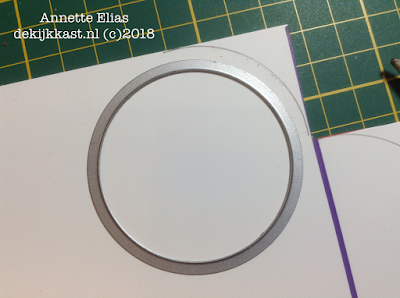
We gebruiken nu een cirkeldie uit de Layering Circles Framelits als een malletje om de hoeken rond te maken. We tekenen langs de buitenkant van de cirkeldie de vier hoeken af. Op de foto is dat goed te zien. Ik heb de Cirkel-Die met de doorsnede van ongeveer 5,5 cm genomen.
We now use a Circle die from the set Layering Circles Framelits as a template to draw rounded corners. Take the 5,5 cm circle and draw around it as shown on the picture below.


Teken nauwkeurig de lijnen en knip dan langs de lijnen de hoeken zodat ze mooi afgerond worden.
Draw very carefully, and then cut along the drawn lines to make nice rounded corners.

Je hebt dit met beide stukken Bermuda Bay Cardstock gedaan en hebt nu dus twee gelijke delen. Je vouwt de zijflappen naar binnen, de andere vouwlijnen laat je nog even plat.
You have done this with both pieces of Bermuday Bay Cardstock, so now you have two pieces that look the same! You can now fold the flaps on the sides but leave the other scored lines flat for now.

Neem een van de delen en leg de ( nog steeds de zelfde) circledie precies in het midden bovenaan. Eventueel kun je hem met een klein stukje washi even vastplakken. Doordat de zijflappen naar binnen gevouwen zijn past het geheel nu precies door je Big Shot
Take one of the parts and position the same Circledie exactly in the middle at the top. You can use a piece of Washi tape to hold it in place. With the flaps folded inwards the piece fits in your Bigshot.

Leg beide delen nu rug aan rug en kijk met behulp van het eerste stuk waar de circle moet komen op het tweede deel. Het eerste deel dient dus even als malletje. Gebruik weer wat washi. Neem dan het eerste deel weg en stans vrevolgens ook de halve circle uit het tweede deel.
Now lay the other piece back to back to the first piece and attach the circledie on the second piece. The first piece serves as a template now. Take away the template now and diecut the second piece too.

Om het doosje straks goed te laten sluiten knip je van de onderste twee flappen een strookje
van 1/2 a 1 cm
af en doe dit bij beide doosdelen.
To make the boxes fit you have to cut a small strip (1/2 of 1 cm) from the bottompieces of both box-parts.

Vouw nu ook de andere gerilde lijnen. Plak nu het kleine flapje aan de buitenkant van de voorflap. Maak je geen zorgen: Dit is straks helemaal weggewerkt.
Now burnish all the scored lines. Then glue the small flap on the outside of the front flap. Don't worry: You will not see this when the box is finished.

En dan plak je nu de overgebleven flappen daar om heen. Deze flappen steken net iets uit, wat een sjiek effect heeft.
Now glue the flaps around this. Those flaps are a bit wider, which gives the boxes a fancy look!


Deze doosjes plakken we nu netjes rug aan rug. Als je netjes gemeten hebt sluit alles mooi op elkaar aan.
Now glue both boxes back to back. When everything went well it will fit perfectly.

De handgreep
The handle
Om de handgreep te maken heb je weer de zelfde circledie van ongeveer 5,5 cm nodig, plus een iets grotere van ongeveer 6.7 cm doorsnede. Leg ze beiden in elkaar op een stuk Basic Black Cardstock
To make the handle we need the same Circledie again (5,5 cm) PLUS a bigger circle, of 6,7 cm. Lay both pieces nested on some Basic Black Cardstock

Stans deze uit, en herhaal dit zodat je twee ringen krijgt. De zwarte circels die je over hebt bewaar je voor straks
Cut this out and repeat so you get two rings. Save the black circles that are left for later.

Plak met een heel klein beetje Multi Purpose Liquid Glue een ring op het doosje en herhaal dit met de andere ring aan de andere kant.
Glue one ring on the box with very little Multi Purpose Liquid Glue, and repeat this with the other ring on the other side.


Decoratie
Decoration
Voor de aankleding neem je twee stukjes Basic Black Cardstock van 13,5 x 6 cm
en twee stukjes Whisper White Cardstock van 12,5 x 5 cm
De witte delen bestempel je met de Post Script achtergrondstempel en Bermuday Bay Inkt!
For the decoration we need two pieces of Basic Black Cardstock of 13,5 x 6 cm and two pieces of Whisper White Cardstock of 12,5 x 5 cm.
We stamp the White pieces with the Post Script Background Stamp and Bermuda Bay Ink!

We plakken de delen op elkaar en voegen dan aan beide panelen wat mooi bijpassend Mini Chevron Lint toe.
We glue the pieces together and add some lovely matching Mini Chevron Ribbon to both panels.

Nu nemen we de twee Basic Black Cirkels die we bewaard hadden en bestempelen deze met een bijpassende tekst uit de set Craftin Forever en Versamark inkt, en embossen deze met Whisper White embossingpoeder en de Heat Tool.
Now we take the two Basic Black Circles that were left over, and we stamp them with a matching stamp from the set Crafting Forever and Versamark Ink. We Heat emboss it with Whisper White Embossingpowder and the Heat Tool.

De panelen komen op het doosje, en daarop plakken we met Dimensionals de gestempelde circles.
We glue the panels on the box and on top of that we attach the stamped circles with Dimensionals

Nu kun je het doosje vullen met handige spulletjes. Het maatje is perfect voor een half pak Postcards and envelopes, Multi Purpose Liquid Glue, Journaling Pennen, Dimensionals, Snail Adhesive, Tear and Tape adhesive en een Paper Snips! En ik heb hier en daar wat extra lint toegevoegd, dat maakt het net af!
Now fill the box with goodies, the box is perfect to fit in half a pack of Postcards and envelopes, Multi Purpose Liquid Glue, Journaling Pens, Dimensionals, Snail Adhesive, Tear and Tape adhesive and a pair of Paper Snips! Adding some extra ribbon here and there finishes of the look of the box!


Ik hoop dat je mijn tutorial leuk vond. Maak hem lekker na voor persoonlijk gebruik en laat me vooral je resultaat zien! Een leuke reactie is sowieso heel welkom en laat mij weten of mijn tutorial en project in de smaak vallen! Bedankt voor je bezoekje aan de Kijkkast, en weet dat je altijd welkom bent om weer een kijkje te nemen.
Veel plezier verder in deze bloghop! De volgende hop is bij Sharlene!
I hope you like this tutorial. Please feel free to make it for your personal use and it would be so nice when you show me your results. A reaction is very much appreciated, and lets me know whether my project and tutorial are easy to follow and hopefully liked! Thanks for coming to de Kijkkast and please feel welcome to come back whenever you like!
Have fun hopping to the other designteammembers! Next stop is at the blog of


Bloghoplijst:
1. Shannean Moncrieff (Australia)
2. Tanja Kolar (Germany)
3. Yoshiko Endo (Japan)
4. Zoe Tant ( United Kingdom)
5. Annette Elias (Netherlands)
6. Sharlene Meyer (New Zealand)
7. Beate Wacker (Austria)
8. Aude Barbara (France)
9. Barb Stewart (Canada)
Gebruikte producten/Used Products:
Stempels: Crafting Forever, Post Script
Papier: Cardstock: Bermuda Bay, Basic Black, Whisper White
inkt: Bermuday Bay, Versamark
Dies: Layering Circles Framelits
Embellishments: Embossingpowder Whisper White, Mini Chevron Ribbon Bermuda Bay
Tools: Bone Folder, Stampin'Trimmer, Embossing Buddy, Heat Tool

Tot snel!
Annette
NIeuw: Bemachtig uitlopende producten voor het te laat is!
Kijk hier voor alle informatie

 "Pin on Pinterest")
Eerstvolgende (mee-)besteldagen:
Maandag 23 april om 19.00 uur
Maandag 30 april om 19.00 uur
en spaar voor gratis producten!
***Met diverse Clubvoordelen ;o)***
Heb je de nieuwe Catalogus nog niet in huis?
Vraag er eenvoudig eentje aan door mij een EMAIL te sturen
Oh I love your take on the challenge. It's a fab caddy and beautifully made. TFS. Zoe xx
BeantwoordenVerwijderenDit is erg prachtig. ZOOOOO mooi.
BeantwoordenVerwijderenDear Annette, this is such an amazing idea. I am speechless.
Thank´s for being part of our amazing group.
Liefs Tanja
I beyond love your project! I can’t wait to try it out! Thanks for sharing!
BeantwoordenVerwijderenSCHITTEREND denk dat ik hem ga maken als cadeautje voor mijn dochter voor kleine haakprullaria in te doen
BeantwoordenVerwijderenLoved your creation, well done.
BeantwoordenVerwijderenSuperleuk!
BeantwoordenVerwijderenOh this is just stunning Annette! I love your use of the caddy, but especially the shape and curves of it - it has a very Art Deco style to it!
BeantwoordenVerwijderen